Train & Bus Driving Simulator
🙋 リクエスト:
おっかーつのだしおかやまけん
+ 改善: 山田太郎、T-Rex
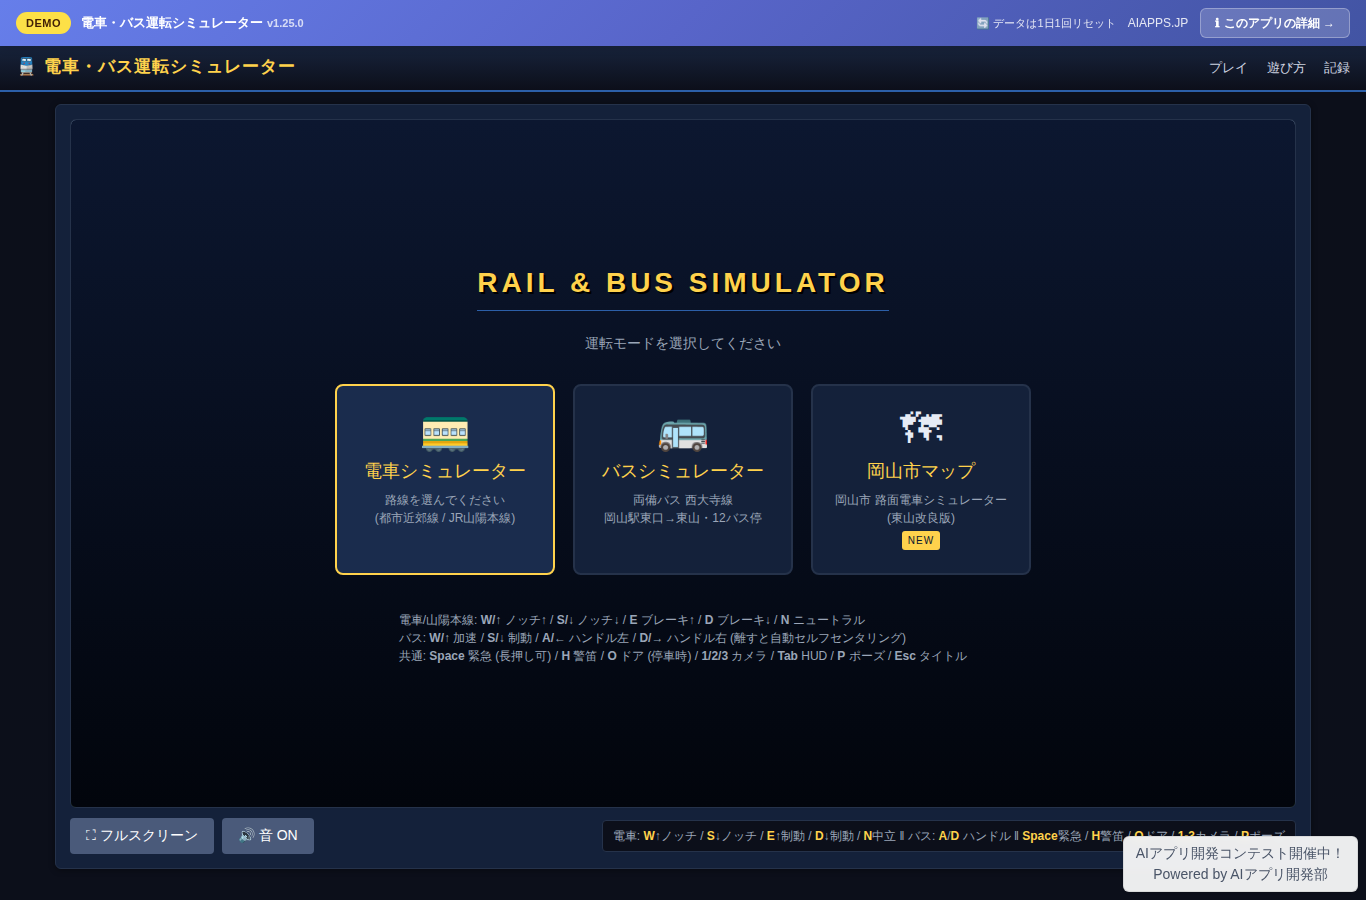
App screen preview
Overview
A browser-based train and bus driving simulator built with Three.js. The title screen offers two modes — "Train Simulator" and "Bus Simulator." Choosing the train leads to a route selection screen with the Suburban Line (commuter train, 5 stations) or the JR Sanyo Main Line (Okayama → Kasaoka, 9 stations, 44 km real distance). On the Sanyo Main Line you can also pick a departure station (8 stations from Okayama to Kamogata) for section practice runs to the Kasaoka terminus. Features include per-section bus speed limits (10–40 km/h), escalating speeding warnings (yellow → flashing red → red text with time-based penalties), precision stopping scores of PERFECT/S/A/B/C, on-time operation bonuses (±30 seconds), S+ streak combos, and stopping accuracy graphs. No installation required — runs entirely in the browser (Three.js loaded via CDN). In addition, the "Okayama City Map" mode displays the Okayama City Tram Simulator (Higashiyama Improved Edition) full-screen as user-supplied HTML (#151).
Key Features
- Okayama City Map Phase 3 (v1.28.0, #1556) - Clockwise analog speedometer with 50 km/h tram and 80 km/h bus caps; control HUD showing tram 4-step notch / 6-step brake and bus ACCEL/BRAKE percentages exclusively; NEXT STOP bar with yellow within 100 m, flashing red within 30 m, and a green ±5 m stop-zone band; tram-only 3-state display (moving / decelerating / stopped)
- Okayama City Map Phase 2 (v1.27.0, #1556) - Voice guidance within 300 m of the next stop (once per stop), master sound volume 0–100% (saved as okayama_soundVolume, default 70%), fullscreen toggle, and Easy/Normal/Hard difficulty (PERFECT ±5 m/±2 m/±1 m, score ×1/×1.5/×2, time limit on Hard)
- Okayama Mode Phase 1 (v1.26.0, #1556) - Bus top speed of 80 km/h, independent tram/bus loops, 3-route minimap, per-mode best scores, results with stopping accuracy, and Esc-confirmed exit
- Station arrival announcements + door SFX + softer acceleration sound (v1.23.0, #127) - Three audio improvements for rail modes (train / sanyo / Okaden Okayama tram): station approach announcements, arrival door open/close effects, and removal of the "harshness" in the acceleration sound / (1) Station approach announcements via the Web Speech API: "Now approaching XX Station" is spoken once within 500 m (displayed distance) of the next station / trams say "XX Stop"; no suffix is appended if the name already ends in "Station / Stop" / duplicate prevention per stopIndex via state.approachAnnouncedStop / (2) Door open/close SFX + announcements via the Web Audio API: on rail-mode arrival (0.6 s after Audio.chime), Audio.doorOpenSfx (air valve noise → rising 600 Hz → 800 Hz two-tone, triangle) plays with "The doors are opening" / 1.8 s later, just before proceeding to the next station (except at the terminus), Audio.doorCloseSfx (falling 900 Hz → 650 Hz two-tone → air valve noise, triangle) plays with "The doors are closing. Please stand clear." / the existing Audio.door (for toggleDoor) is unchanged (backward compatible) / buses and Ryobi Bus are excluded / (3) Reworked VVVF acceleration sound: the square wave + sharp step dip + high-frequency whine from v1.21.0 #123 was reported as "grating," so the carrier was changed from square to triangle (greatly reducing harmonics), lowpass cutoff 2400 → 1600 Hz, step transition dip 0.35× → 0.65× (softer switching), frequency setTargetAtTime time constant 0.04 → 0.12 s (smoother pitch changes), and peak gain 0.10 → 0.08 / the high-frequency whine was moved from 600–1700 Hz down to the 480–1050 Hz mid-high range, peak volume halved from 0.05 → 0.025, and onset shifted from 30 → 40 km/h / tram and bus engine sounds are completely unchanged (backward compatible) / Audio.announce / stopAnnounce / doorOpenSfx / doorCloseSfx newly added / existing Audio.chime / Audio.door / Audio.departureBell unchanged
- VVVF inverter-style acceleration sound + volume slider (v1.21.0, #123) - Motor sound in train/sanyo modes reworked to emulate a real VVVF inverter / added masterGain to Audio, routing all sound through it / added Audio.setVolume(0..1) to change volume at any time / VVVF: the previous continuous sweep of the base motor frequency (sawtooth, 60→280 Hz) tied to speed is preserved, with two additional oscillators running in parallel — a PWM carrier (square, 4-step at 196/247/294/370 Hz, switching at 0-15/15-30/30-50/50+ km/h) and a high-frequency magnetostriction whine (sine, 600→1700 Hz, increasing above 30 km/h) / at each step transition the carrier gain dips to 0.35× to recreate the audible "click" of a gear step / above 50 km/h in the synchronous region the carrier drops to 0.55×, letting the whine take over / at notch 0 while stopped, everything including the VVVF fades to complete silence (only coasting rail noise remains) / tram and bus engine sounds unchanged (backward compatible) / UI: a "Volume" slider (0-100%, 1 step) in the options panel changes all SFX volume in real time / the setting is saved to localStorage as settings.soundVolume and restored on next launch (default 60%) / independent of the existing 🔊/🔇 ON/OFF toggle (the slider value is retained even when off) / responsive: inherits the opt-row flex layout so it renders correctly on both desktop and mobile
- Okayama City Map full coordinate-spec rebuild (v1.20.0, #122) - Per spec #122 "Okayama City Map Complete Coordinate Specification (for AI implementation, final edition)," the Okayama shared map was rebuilt in full compliance with the coordinate grid of the attached route map image (img16): X 0–3500 / Z 0–3000 (1 unit = 1 m) / added the okayamaSpec(specX, specZ) conversion helper (world_x = spec_x - 1750, world_z = spec_z - 1500) mapping the world center to the spec center (1750,1500) / 21 stops (Higashiyama Line H01-H10 + Seikibashi Line S01-S09, with shared S01-S03 = H01-H03) placed exactly per the spec §3 coordinate table: H01 Okayama Ekimae (100,900) → H04 Shiroshita (1300,900) → H06 Saidaijicho (1300,1800) → H10 Higashiyama (3200,2100) / the Seikibashi Line runs straight south from Yanagawa S03 (X=900, Z=900→2700) through Tamachi, Shin-Saidaijicho-suji, Daiunjimae, Higashi-Chuocho, and Seikibashi / Momotaro-odori §4 spec: 42 m total width, 5-section cross-section (6 m north sidewalk + 10.5 m north roadway + 3 m central track + 10.5 m south roadway + 6 m south sidewalk), colors: roadway #444444 / track #8B6B4A (brick) / sidewalk #D4C5A0 / white dashes #FFFFFF / centerline #FFDD00 / Nishigawa Ryokudo Park-dori §5 18 m total width / Higashiyama Line route §6 13 m total width / Asahi River §10 X≈1900-2200 (center X=2050), 90 m wide, color #5B9FB5 / 7 bridges §10: Shin-Tsurumibashi (Z 50) / Tsurumibashi (300) / Tsukimibashi (850) / Aioibashi (1450) / Kyobashi (1800) / Shin-Kyobashi (2350) / Sakurabashi (2850), all placed on the Asahi River center line X=2050 / 9 major buildings §11: Okayama Station (50,800,120×80×25) / Takashimaya (150,1100,60×40×32) / AEON Mall Okayama (150,1400,150×80×22) / Korakuen (1800,600,280×200, greenery) / Okayama Castle (2000,900,28×28×32) / Tenmaya (950,1500,80×40×36) / Harenowa (1100,2100,100×60×18) / Okayama Prefectural Office (1600,1500,70×60×34) / Okayama City Hall (200,2400,80×40×28) placed at spec coordinates / plus the Symphony Hall south of Shiroshita Station (added in v1.18.0 #116 per user feedback) is retained / plane trees §4: strictly per the spec's "only between Okayama Ekimae and the Yanagawa area," placed only in the spec X 100-950 range (just short of Yanagawa), at 15 m intervals, 5 m trunk height + 3 m canopy radius (8 m top) in color #4A8A2A, along both sidewalks of Momotaro-odori / no trees at all around Shiroshita (X>=1000) per the spec's "do not place trees around Shiroshita" / tram controls §13 ("no steering wheel (A/D disabled) / W accelerate / S brake / E emergency brake / automatic track following") retain the existing v1.16.0 #112 implementation / bus §14 ("A/D for front-wheel steering / does not move while stopped / no track following") retains the existing v1.14.0 #111 + v1.16.0 #112 implementation / ground size expanded to 3600×3100 m (full spec area + margin) / existing modes (train/sanyo/straight bus / Saidaiji Line real road v1.5.x) are completely unchanged (only OKAYAMA_* constants updated)
- Okayama shared map: Yanagawa junction + Symphony Hall added (v1.18.0, #116) - As Phase 3 of spec #116 (complete Okayama City Map rebuild), H03 Yanagawa (pos:670) was added to the Higashiyama Line stop list and the junction with Seikibashi Line S03 Yanagawa is now explicit on Momotaro-odori at (-180, 20) / a junction waypoint (-180, 0, 20) was inserted into OKAYAMA_HIGASHIYAMA_WAYPOINTS (refining the Yanagawa corner of the Catmull-Rom curve; converges downstream so the visualpos of H04 Shiroshita through H10 Higashiyama is unaffected) / existing stop pos values (H02:500, H04:840, H05:1080, ...) fully preserved (backward compatible) / "Okayama Symphony Hall" (x:-30, z:110, w/d:36, h:24, 0xc8c0b6) added to OKAYAMA_LANDMARKS (a major landmark south of Shiroshita Station pointed out by a user in thread #116) / the 10 existing landmarks are unchanged in coordinates and size / existing modes (train/sanyo/straight bus / Okaden tram Phase 2 / Ryobi Bus Saidaiji Line) completely unchanged / the full spec (redefined X 0-3500 / Z 0-3000 coordinate system, detailed 42 m Momotaro-odori cross-section rendering, 15 m plane tree spacing, brick-colored #8B6B4A tram track paving) requires precise cross-checking against the attached route map image and will be handled in Phase 4 after human review
- Complete rebuild of Okaden tram mode (v1.16.0, #112) - Per spec #112, the Okaden Higashiyama Line and Okaden Seikibashi Line on the Okayama shared map were migrated to Phase 2 (rail physics) / (1) Steering fully removed: when a tram is selected, A/D and ←/→ input is disabled and the vehicle always faces the tangent of the track (Catmull-Rom curve) / busHeading / steerAngleDeg / lateralOffset are pinned to 0 in both the physics and render loops / the Ackermann steering heading update block is guarded by `state.mode === 'bus' && !isOkayamaTramState()` / (2) Stepped notch + stepped brake controls: W/↑=notch +1 (max 4 steps) / S/↓=notch -1 / E=brake +1 (max 6 steps) / D=brake -1 / N=neutral / Space=emergency brake / physics changed to notchAccel=0.40 m/s² per step, brakeDecel=0.55 m/s² per step, rollingFriction=0.05 (steel wheels) / top speed remains 40 km/h / (3) Oncoming-lane warnings fully removed: as requested in the spec, the "⚠ Watch for oncoming traffic!" and "⚠ Lane departure" banners never appear while driving a tram (the entire bus physics block is skipped, so there are no side effects) / (4) Switched to rail audio: rail joint clatter (speed-linked pitch, 25 m intervals), brake shoe squeal, air valve hiss, and the departure bell now also apply to trams / (5) Stepped HUD display: the notch bar (4 steps) and brake bar (6 steps) now use the same stepped display as train mode, and the ammeter and pressure gauge are normalized by maxNotch/maxBrake / (6) The `isOkayamaTramState()` helper centralizes detection, and an `isTramOkaden` flag was added to cfg / Ryobi Bus Saidaiji Line and straight bus mode retain Ackermann physics (backward compatible) / existing modes (train/sanyo/straight bus) unchanged
- Four fixes for bus controls, camera, and Saidaiji Line roads (v1.14.0, #111) - (1) Bus front-wheel pivot rotation (Ackermann behavior) - buildBus() was restructured into a 3-level hierarchy (vehicleGroup / steerPivot / body) with steerPivot placed at the front wheel position (local z=-3.3) / applying the steering yaw vyaw to steerPivot in renderFrame() recreates the arc a real bus traces around its front wheels (Ackermann-style front-wheel steering) / the old implementation rotated vehicleGroup about its center axis, producing an unnatural "spin around the rear wheels" motion / the vyaw coefficient was raised from 0.10 → 0.18 to make the steering effect visually clearer / (2) Fixed driver-view (FPV) aspect ratio - a ResizeObserver instantly detects sim-wrap size changes (screen rotation, fullscreen, initial layout settling) with a lightweight per-frame check (maybeReSizeRenderer) as a fallback / the bus FPV height was standardized from 1.6 m to 2.2 m (a large bus driver's eye level), fixing the "only half the screen is visible" symptom (all sky or all road) / lookY was also raised from 1.4 to 1.8 for a better view of the distance ahead / (3) Fixed truncated Saidaiji Line road - buildSaidaijiRoad / addSaidaijiEnvironment looped over the road using curve.userData.length (actual arc length ~2067 m), which did not match the SAIDAIJI_TOTAL_POS (2900 m) normalization basis of saidaijiPosToWorld, so the road, buildings, sidewalks, and centerline were not generated for the remaining 29% and vanished partway / both now use totalLen = SAIDAIJI_TOTAL_POS so the road runs continuously to the Higashiyama terminus / (4) Sunlight shadows + hemisphere fill light - renderer.shadowMap (PCFSoftShadowMap) enabled, sunlight given castShadow + a 1024×1024 shadow map + ±120 m coverage / bus body (bodyBox / roof) and ground cast/receive shadows / a hemisphere light (sky #C8E8F8 → ground #4A6A3E, intensity 0.35) was added so dark areas do not go pure black / sun intensity increased from 0.85 → 1.15 / existing modes (train/sanyo/okayama) are backward compatible (vehicle hideInCab tags, camera positions, and road scale unchanged)
- Removed black occluding objects from FPV (v1.13.0, #110) - Fixed an issue where the vehicle body, front windows, side windows, destination sign, bogies, headlights, tram body, and more blocked the forward view when switching to driver view (FPV / cab) on all vehicles (train / Sanyo Main Line / bus / Okaden tram) / buildScene() now traverses vehicleGroup and defaults any mesh without an explicit tag (cabOnly / hideInCab) to hideInCab=true, ensuring a clear FPV view even on vehicle models without individual tags, such as bus and okadenTram / the Sanyo Main Line FPV window frames (added in v1.6.0 #98 — top/bottom frames, outer vertical frames, center pillar) remained as a large black vertical pillar in the center and black triangles at the sides, so they were changed from cabOnly to hideInCab and are now hidden in FPV (no visual impact from external views, where they are hidden inside the opaque body) / cameraCab near=0.05 / fov=70 and the hideInCab/cabOnly switching logic in updateExteriorVisibility() are unchanged (backward compatible: external follow and overhead camera views look the same)
- Okayama shared map Phase 1 (v1.12.0, #108) - Added a new shared 3D map of central Okayama (1600 m × 1600 m internal scale) / a "🗺 Okayama Shared Map" mode was added as the third card on the title screen / a submenu inside the shared map lets you pick a vehicle: (1) Okaden Higashiyama Line (Okaden tram + all 10 stops: H01 Okayama Ekimae → H02 Nishigawa Ryokudo Koen → H04 Shiroshita → H05 Kencho-dori → H06 Saidaijicho → H07 Kobashi → H08 Chunagon → H09 Kadotayashiki → H10 Higashiyama, approx. 2.4 km) / (2) Okaden Seikibashi Line (Okaden tram + all 9 stops: S01 Okayama Ekimae → S02 Nishigawa Ryokudo Koen → S03 Yanagawa → S04 Yubinkyokumae → S05 Tamachi → S06 Shin-Saidaijicho-suji → S07 Daiunjimae → S08 Higashi-Chuocho → S09 Seikibashi, approx. 2.1 km; Okayama Ekimae to Nishigawa Ryokudo Koen is shared with the Higashiyama Line) / (3) Ryobi Bus Saidaiji Line (Ryobi Bus vehicle + all 11 stops: Okayama Station East Exit → Okayama Ekimae → Nishigawa Ryokudo Koen → Tenmaya → Chugin-mae → Kencho-mae → Saidaijicho → Furukyo → Kadotayashiki → Sanyo Gakuen-mae → Higashiyama, approx. 2.5 km) / switching vehicles keeps the same city (roads, buildings, Asahi River, tracks) / the 3 routes are defined with Catmull-Rom curves / the 4 main roads (Momotaro-odori 42 m wide, Route 180 18 m wide, Akura-dori 14 m wide, Shiroshita-suji 14 m wide) are drawn with box geometry / Asahi River (90 m wide) + 4 bridges (Shin-Tsurumibashi, Tsurumibashi, Tsukimibashi, Asahigawabashi) / 10 major landmarks (JR Okayama Station, Tenmaya, AEON Mall Okayama, Okayama Prefectural Museum of Art, Harenowa, Hayashibara Museum of Art, Okayama City Hall, Okayama Castle keep, Korakuen, Ujo Park) placed at real scale with color-coded hues / tracks are placed 1 cm above the road at standard gauge 1.435 m (to prevent Z-fighting) / tram mode reuses the existing train physics (notch + brake + precision stopping score) and bus mode the existing bus physics (accelerator + brake + escalating speeding warnings) (backward compatible) / existing modes (Suburban Line train / Sanyo Main Line sanyo / Saidaiji Line bus) unchanged
- Four Sanyo Main Line fixes (v1.11.0, #109) - (1) Added a hard cap of 100 km/h for the line speed limit (previously only the Easy-only ATC soft brake existed, so holding a notch could briefly exceed it) / (2) The Kurashiki Station approach curve (equivalent to R600 m, a -9 m left bump at internal pos 1430-1750) and the Kamogata–Kasaoka S-curve section (+10 m → -10 m at 3130-4400) are implemented via getSanyoCurveOffset() / ballast, rails, and sleepers are segmented and placed with tangent yaw, and station markers, signals, the vehicle, and all cameras (FPV / follow / overhead) track the same offset / (3) The stop target board (▼) was enlarged from 30 cm × 40 cm to 80 cm × 100 cm with a thicker post (easier to see from the driver's seat) / the white line between the rails was also enlarged from 1.5 m × 0.20 m to 2.5 m × 0.60 m / mode detection now also covers sanyo / (4) For all rail modes (train/sanyo), passing a red signal now applies a -500 pt penalty plus a warning instead of triggering game over (bus mode retains the previous -300 pt, backward compatible) / the DISTANCE label in the top-right HUD now reads "To Station (DISTANCE)"
- Saidaiji Line roadside street-view recreation (v1.10.0, #106) - Road half-width (4–12 m), sidewalk width (1.6–6 m), and paving color switch across 8 sections: Momotaro-odori (3 lanes each way, 24 m wide, with a central tram track on a green turf bed and standard-gauge 1.435 m steel rails), Kencho-dori (2 lanes each way, narrower), Shiroshita-suji, residential areas, and on to the Higashiyama terminus / plane trees (0.4 m trunk radius × 5 m tall + 6 m canopy) at 12 m intervals along Momotaro-odori, with smaller street trees in residential areas / 14 landmarks placed at real scale with color-coded hues: JR Okayama Station building, Bic Camera, Hotel Granvia, Dai-ichi Central Building, NTT Okayama, Chugoku Bank head office, Okayama Takashimaya, AEON Mall Okayama, Tenmaya Okayama main store, Chugoku Electric Power, Okayama Prefectural Office, Hayashibara Museum of Art, Sanyo Gakuen, and the Okaden Museum / white dashed lane markings drawn per section (2 lines plus both edges for 3 lanes each way) / bus stops and signals repositioned to the outer sidewalk edge per section / in Saidaiji mode the sky switches to #87CEEB, sky dome to #C8E8F8, and THREE.FogExp2(0xC8E8F0, 0.002), reverting to defaults in other modes (backward compatible) / the driving line, curves, bus stop pos values, and speed limits are unchanged from v1.5.0/1.5.1
- Sanyo Main Line per-section speed limits + 100 km/h cap (v1.9.0, #102) - Line speed limit raised from 95 km/h to 100 km/h (the real top speed of the 115 series) / added per-section sectionSpeedLimit values (Nishiachi→Shin-Kurashiki and Konko→Kamogata = 95 km/h, the Kamogata→Kasaoka S-curve section = 85 km/h, all other sections = 100 km/h) / station approach speeds revised to 65 km/h for the Kurashiki approach curve (R600 m) and the Kasaoka approach, and 70 km/h for other stations / slicedSectionSpeedLimit is kept in sync even when buildSanyoRunCfg has startIndex>0 (section practice) / train and bus modes keep their previous behavior (backward compatible)
- HUD remaining-distance progress bar (v1.8.0, #103) - A 5 km-scale progress bar is shown below DISTANCE in the top-right NEXT panel / turns yellow under 500 m remaining and red under 200 m (the DISTANCE text changes in sync) / supports displayScale (the Sanyo Main Line uses real meters)
- Stop target approach indicator (v1.8.0, #103) - Added a horizontal 1000 m → 0 m scale bar to the stop target HUD / the 60 m stop zone is shown as a dotted yellow area at the right end / the current distance is overlaid as a white marker / responsive (scaled to 150 px on mobile)
- Rail stop target boards ▼ + white line between rails (v1.8.0, #103) - Double-sided 30×40 cm white "▼" boards installed at all rail stations (Suburban Line / Sanyo Main Line), set 50 cm in from the platform edge at +1.5 m above ground / white 1.5 m × 20 cm stop position paint between the rails / the existing yellow line (stop position center) is preserved as is
- Analog speedometer + instrument panel (v1.8.0, #103) - Added an SVG dial-style analog speedometer, 0–120 km/h (needle rotation -220° to +40°), at the bottom center of the screen / current speed shown digitally at the center / the needle turns orange above 80 km/h and red above 95 km/h (or at speeding level 3) / bar-type sub-meters: an ammeter on the left (notch scaled to 0–300 A) and a pressure gauge on the right (brake 0–100%) / the existing top-left digital speedometer and bottom-left notch/brake bars are preserved (backward compatible) / on portrait phone screens only the speedometer is shown (narrow-screen optimization)
- Stronger speed-linked pitch for rail clatter (v1.8.0, #103) - Added pitchMult/volMult arguments to the railClack rail joint sound / from 0 to 100 km/h the frequency scales linearly 0.8×→1.4× and volume 0.6×→1.0× / the existing 25 m interval and displayScale support are unchanged (backward compatible)
- Multi-level menus (v1.7.0, #101) - The title screen was reorganized into two modes, "Train Simulator" and "Bus Simulator" / choosing the train leads to route selection (Suburban Line, JR Sanyo Main Line, Mountain Line (coming soon), Subway (coming soon)) / choosing the JR Sanyo Main Line leads to departure station selection (8 stations from Okayama to Kamogata, running to the Kasaoka terminus) / each submenu has a back button, subtitle, and per-step highlighting / backward compatible: the existing mode/best/total localStorage keys (train, bus, sanyo) are still used
- Sanyo Main Line departure station selection (v1.7.0, #101) - Pick your departure station from 8 options — Okayama (full 44 km route), Niwase, Nakasho, Kurashiki (medium distance), Nishiachi, Shin-Kurashiki, Konko, and Kamogata (short and easy) — and run to Kasaoka / each station card shows the reading, remaining station count, remaining distance (km), and difficulty rating (★) / changing the departure station generates a run cfg with stops/arrivalSpeedLimit/scheduleSecondsBetween renormalized (the original SANYO_CFG is left untouched = backward compatible)
- Minimap as route diagram (v1.7.0, #101) - On the Sanyo Main Line all 9 stations are shown as dots: stations before the departure point are translucent gray (pre-start), passed stations are green with a ✓ mark, and the current position is a blue pulsing marker (glowing on a 1.2 s cycle) / displayStops/displayPosBase are attached to cfg to convert between internal and original coordinates / other modes (train/bus) keep their previous rendering
- Train mode (commuter train, Suburban Line, 5 stations) - Stepped notch acceleration / 8-step brake / signal compliance / precision stopping evaluation
- Reworked 3D vehicle model (v1.3.0, #92) - JR West Okayama livery (stainless #C8C8C8 + orange stripe #F77F00) with a rounded body / 20 m long × 2.8 m wide × 3.6 m tall / twin trapezoidal cab windows + 2 headlights + (dummy) coupler / 12 evenly spaced passenger windows / pantograph (diamond, simplified model) / bogies + wheels
- Complete FPV camera fix (v1.3.0, #92) - Set back 0.40 m from the front end / height 2.4 m (driver's eye level) / body, roof, stripe, windows, bogies, coupler, and pantograph all hidden / only the cab dashboard (master controller, brake lever) shown
- Signal ATS / ATC logic (v1.3.0, #92) - Red signal: the safe stopping speed is back-calculated from the remaining distance and ATS applies forced braking (notch disabled + emergency deceleration ×0.9) / yellow signal: automatic 65 km/h limit + warning / passing a red signal (above 5 km/h) is an instant game over
- Realistic Web Audio (v1.3.0, #92) - Rail joint clatter (25 m intervals, speed-linked) / brake squeal (high-frequency bandpass) / air brake hiss (white noise burst) / running wind (sustained bandpass noise with speed-linked gain) / departure bell (5 high notes) / ATS buzzer (continuous beeping) / electric-style horn (long single tone)
- Driver-view (FPV) fix (v1.2.1, #93) - The camera was repositioned inside the front of the vehicle (1 m back from the nose, 1.2 m high, centered on the track) / in FPV the body, roof, stripe, and side windows are hidden and near clipping is lowered to 0.05 to stop the roof mesh from clipping into view
- Realistic station platforms (v1.2.1, #93) - +1.1 m above rail level / 4.5 m wide / yellow tactile paving line along the platform edge / roof (canopy) and pillars / double-sided station name signs in black on white
- Real-vehicle-style independent 2-axis controls (v1.2.0) - The acceleration notch (W/↑↓ S) and the brake (E/D) are operated in steps with independent keys / simultaneous input not allowed / N key for instant neutral / one step at a time even when held down
- Relaxed scoring (v1.2.0) - No penalty for emergency braking / minor speeding gives only a warning / starts from a score of 0 for a balance beginners can enjoy
- Bus mode Phase 1 realism (v1.4.0, #97) - 7 m wide road (solid yellow centerline + white dashed shoulder lines + 2 m sidewalks on both sides + curbs) / 6 bus stops: Depot → City Hall → Central Park → Ekimae-dori → Hospital → Terminus/Garage / crosswalks
- Steering physics (v1.4.0, #97) - A/← steers left / D/→ steers right / max ±35° / self-centering (proportional to speed) / reduced response at speed (100% below 10 km/h, tapering linearly to 50% above 50 km/h) / HUD steering angle indicator (rotates with the angle, orange at ±15°, red beyond ±28°)
- 3D bus stop realism (v1.4.0, #97) - 3 m blue pole / double-sided sign board in blue on white / clear acrylic-style 4 m roof + steel frame + 2 posts / wood-style bench (with backrest and legs) / yellow "Bus Stop" road paint on the roadway side
- Lane driving (v1.4.0, #97) - Japanese left-hand traffic / starts at the center of the driving lane (1.75 m to the left of the direction of travel) / lateral drift based on steering angle and speed / deviating more than ±1.0 m from the lane center shows "⚠ Lane departure" on the HUD / deviation toward the oncoming lane (+X side) is shown separately as "⚠ Watch for oncoming traffic!"
- Bus mode (route bus, city route, 6 stops) - Analog acceleration and braking / physical steering / precision stopping at bus stops / signal handling
- Ryobi Bus Saidaiji Line realism in bus mode (v1.5.0, #99) - 12 stops: Okayama Station East Exit → Okayama Ekimae → NTT Okayama-mae → Tenmaya → Chugin-mae → Chuden-mae → Kencho-mae → Furukyo → Kadotayashiki → Sanyo Gakuen Junior/Senior High School → Higashiyama Tram Stop → Higashiyama, approx. 2.9 km total / per-section speed limits of 10–40 km/h (10 km/h in the bus terminal, 40 km/h on Momotaro-odori, 30 km/h in the city, 20 km/h near tram stops, 10 km/h at the terminus)
- Escalating speeding warnings (v1.5.0, #99) - Limit +0–10 km/h: speedometer turns yellow (no penalty) / limit +10–20 km/h: flashing red + warning tone + -50 pt/sec / limit +20 km/h or more: "⚠ Speeding!" + -100 pt/sec / speeding never causes a game over
- Relaxed red signals in bus mode (v1.5.0, #99) - Passing a red signal does not cause a game over; it applies a -300 pt penalty and a warning tone only (rail modes keep the instant game over as a safety requirement)
- Ryobi Bus livery (v1.5.0, #99) - Body: cream white #F5F0E0 / stripes: orange #E8580A + red #C0392B (two horizontal side stripes) / front destination sign: white text on black reading "Saidaiji"
- Realistic Saidaiji Line road shape (v1.5.1, #100) - The road, previously a straight line along -Z, was changed to a real route based on CatmullRomCurve3 (centripetal Catmull-Rom parameterization) / a curved route of about 2.4 km with 34 waypoints, including the right turn onto Momotaro-odori, the left turn at Tenmaya, the left turn at Chuden-mae, the gentle right curve at Kencho-mae, and an S-curve section / the road, centerline, dashed shoulder lines, sidewalks on both sides, curbs, crosswalks, lane guides, plus bus stops, signals, roadside buildings, and street trees are all placed following the curve tangent / the bus position, yaw angle, and the driver/follow/overhead cameras also follow the curve
- Sanyo Main Line 115 series (yellow) vehicle rework (v1.6.0, #98) - The Sanyo Main Line mode now uses its own livery: the JR West 115 series in solid yellow (mustard yellow #F5A800 / gray roof #888888 / dark gray underfloor #333333) / the front has an "Okayama" destination sign (white on black) + 2 red tail lights + 2 black wipers + 2 headlights + a dummy coupler / 2 packaged air conditioners on the roof plus 2 diamond pantographs (lead car + second car) / a 4-car formation (lead car + 2 intermediate cars + tail car) where the tail car also has cab-end styling (front lights, tail lights, cab windows) / in FPV the black window rubber frames are shown around the cab window while the body mesh remains hidden / train mode keeps the previous Okayama silver livery with an orange stripe (backward compatible)
- Sanyo Main Line mode (JR Sanyo Main Line, Okayama → Kasaoka, 9 stations, 44 km real distance) - Via Niwase, Nakasho, Kurashiki, Nishiachi, Shin-Kurashiki, Konko, and Kamogata / station approach speed limits / per-section timetable (on-time operation ±30 seconds)
- Precision stopping score system (Sanyo Main Line) - 6-tier grading: PERFECT (±30 cm) / S (±50 cm) / A (±1 m) / B (±2 m) / C (±5 m) / OVERRUN
- Combo bonus (Sanyo Main Line) - +500 pt for S or better at 3 stations in a row / +1000 pt at 5 stations / +2000 pt and a "Perfect Run" title for PERFECT at every station
- Per-section scenery (Sanyo Main Line) - Urban, rural, industrial, river bridge (Takahashi River), hills, and sea/port (Kasaoka) scenery recreated section by section
- 3D rendering (Three.js r160 CDN) - Skybox, terrain, vehicles, tracks/roads, buildings, and signals generated procedurally
- HUD - Speedometer / notch level / brake level / next station (bus stop) panel / stop target indicator (grows as you approach) / signal display / minimap / combo streak display
- Camera switching - Smoothly switch between driver view, external follow, and overhead views
- Results screen - Rank (S/A/B/C/F) / score / stopping accuracy graph (the Sanyo Main Line shows a bar graph in real meters)
- Difficulty selection - Easy / Normal / Hard change the stopping tolerance and speed penalties
- Web Audio API sound system - Per-mode engine sounds (train: sawtooth 80-400 Hz, muted at notch OFF / tram: triangle 60-220 Hz / bus: 4-speed gearbox sawtooth 80-160 Hz with a dip on gear changes), horns (train: electric horn 392 Hz / tram: two-tone ding-ding bell, mi-do / bus: 466+370 Hz chord horn), departure chime (do-mi-re-ti), rail joint clatter (25 m intervals for rail, 10 m for trams), air brakes, brake shoe squeal, ATS buzzer, door open/close, turn signals (automatic on bus curves), wind noise, and an ON/OFF toggle
- LocalStorage saving - Per-mode best scores, total distance driven, and settings
- Pause / controls guide / settings menu - Available at any time during play
- Responsive design - Optimized for wide desktop screens, single-column mode selection on portrait phones, fullscreen support
- No account or installation required - runs entirely in the browser, 100% client-side
- v1.24.0 (#136): Refined to precise coordinates matching the attached HTML (Okayama City Tram Simulator, Higashiyama Improved Edition) - Higashiyama Line / Seikibashi Line / Saidaiji Line stop coordinates and road centerlines repositioned using HTML PWPath values closer to real geography (Yanagawa X=860, Shiroshita X=1270, and Z=1810 via Kyobashi east of Saidaijicho)
Setup Steps
- Create an account on AI App Lab (if you haven't)
- Download
installer.phpfrom your dashboard - Upload to your server's public directory and run it
- Enter API token → select this app → enter DB info → done
📚 Version History
Showing the current version only. See all versions (31) →
v1.28.0
Current
岡山市マップの速度計・モード別操作HUD・停車残距離表示・路面電車の走行状態表示が、乗り物と操作にリアルタイムで連動するようになりました。
🔒 Log in and a license are required to download